| TNOTE uses an external data file to store sets of typical notes. These data files can be based on any criteria you decide upon. You can mantain a single master data file or multiple data files, one for each project or even one for each discipline. The contents of these files is actually plain text but there is a specific format applied for internal use by TNOTE. Edits should be made through TNOTE to assure that this format is maintained and the data file does not become corrupted and unuseable to TNOTE.
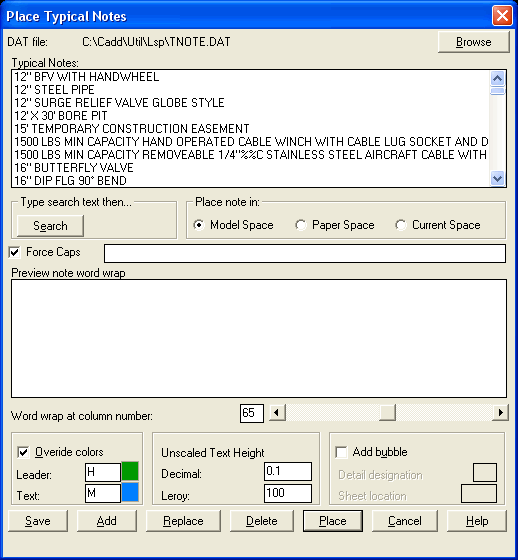
From this main TNOTE dialog there are several options for placing notes:
Positioning the cursor in the Typical notes list box and typing the first character of a note will bring the first note beginning with that character into view in the list box. If the desired note is still not in view you may use the page down key to advance down the list to your desired note. If this process does not locate your desired note quickly and easily, using the search function provided is highly recommended. Afer all, speed and ease of use is very important to the successful implementation of any tool. |
|
|
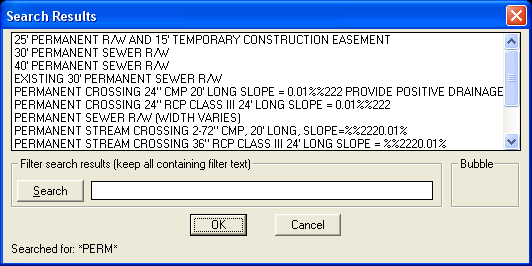
Searching is the fastest way to locate the right note in a large data file. The initial search results may still produce too many matches for easy note selection. Just search the search results using another phrase, word or word fragment. These results are for searching this data file for "PERM". Your search is noted at the bottom of the dialog for your reference. |
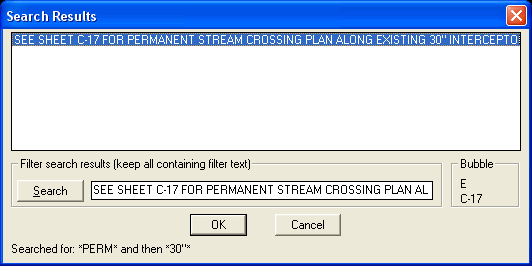
| Searching the initial search results for 30" has located the desired note. Even if there are several matches it is easy to identify and select the appropriate note when they are all visible in the search results box. Notes are always one per line in the notes list and the search results list. Searching will also find long notes with a significant portion extending beyond the edge of the notes list or search results list box.
|
Notice that this note includes a preset bubble reference as indicated by the "Bubble" box. |
| Double-click on the desired note in the search results list or highlight it and pick the OK button. This returns you to the main TNOTE dialog where , if necessary, placement options may be changed and saved to the data file prior to placement of the note.
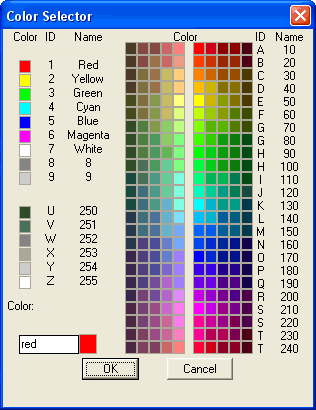
Default colors are white/black for leaders and magenta for text. If you require other colors check the "Overide colors" check box and select the desired color using the color swatches. |
Notice your setting for the "Place note in:" option and make any changes necessary. TNOTE remembers the word wrap column last used for the note. Adjust this setting if necessary. Text height is calculated from the unscaled height specified. Dimscale is used for the scale factor. If dimscale is set to 0 then TNOTE will use viewport scale factors in viewports and prompt you for the scale to use in plain model space. Originally, Leroy sizes were a limited set specific integers that indicated character height in 1000ths of an inch. In TNOTE they still indicate character height in 1000ths of an inch but they can be any real number greater than 0. Specifying a decimal size sets the Leroy size and vice-versa. |
| TNOTE uses an adaptation of the CAD Layer Guidelines layers for note placement. Specific to this adaptation is provision for a color specification in layer names. This color specification occupies one character of the layer name (the 7th character) which otherwise would be an hyphen. All TNOTE text has color BYLAYER and the color you select is assigned to a unique layer for the text. The ID shown in the Color Selector dialog becomes this 7th character in all TNOTE layer names. Since there are only about 38 characters valid in layer names and there are 255 colors it is necessary to make provision for them. Any one ID from A to T represents 10 or 20 possible colors. Note that Each ID also represents a unique layer. Using the same ID for different colors will produce undesirable results as the layer having that ID has its color changed after each color selection. Picking the OK button will apply the color you selected to either the leader color overide or the text color overide as appropriate. No changes are made if the Cancel button is picked. Double-click the color swatch to select and accept (OK) your selection and close the color selector dialog. |
|